This recipe is part of our collection of Chinese holiday and festival foods. Sign up for our newsletter to receive family-friendly activity, recipe and craft ideas throughout the year!
Until recently, mooncakes were on a shortlist of foods that I thought were impossible to make on my own. Purchased from a Chinatown bakery, they seemed too delicate and complicated to contemplate baking them at home. Well, now that I’ve taken the leap and made mooncakes myself, I can tell you confidently that you can, too. Best yet, the results are well worth the effort.
You’ll see mooncakes in every Chinatown bakery during the days leading up to the Mid-Autumn Festival. Mooncakes are notoriously rich and, much like the Western fruitcake, have indeterminate ingredients, especially if they’re imported from overseas. Nonetheless, businesspeople dutifully gift tins of high-end mooncakes to clients and families buy their favorites for their own Mid-Autumn Festival celebrations.
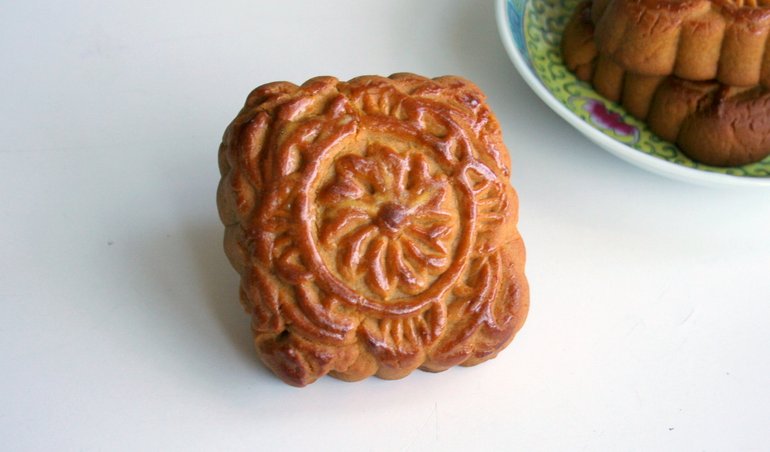
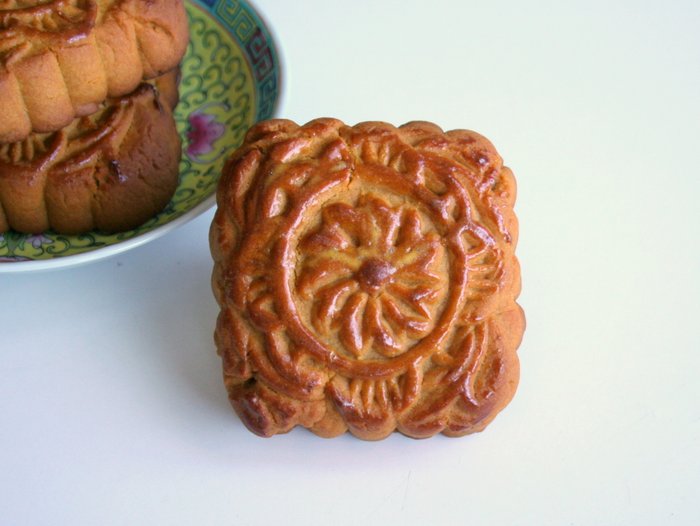
I recently made a batch of 10 mooncakes in my own kitchen and the results were outstanding. Compared with the store-bought alternative, the flavors in my mooncakes were cleaner and fresher. The traditional lotus seed paste filling was smooth and rich, without the cloying aftertaste left by baking fillers and preservatives. It felt great to know exactly what was in my mooncakes.
If you’re thinking about making mooncakes yourself, know this: it’s a simple process, but hard work. The steps take place over two days, but the actual preparation and baking don’t require any special skills. If you can execute directions faithfully, you’ll end up with delicious mooncakes that I promise you will be the most satisfying you’ll ever taste. You’ll love sharing them with your family and gifting them to friends around Mid-Autumn Festival time.
My advice? Take a deep breath and go for it. Biting into your first homemade mooncake is an incredibly rewarding experience.
In terms of special ingredients and tools, there are only three that require a special trip to Chinatown. First, you’ll need a bag of dried, skinned lotus seeds — make sure not to get the kind with the skins still attached. Next, you’ll need a mooncake mold from a kitchen supply store like Chanco here in Oakland. Lastly, you’ll need salted preserved egg yolks, if you want this traditional filling. I’m not a fan of preserved egg yolks, so I left them out.
Here’s how to make lotus seed mooncakes, step-by-step. The detailed tutorial with pictures and directions is at the bottom of the page.
Your turn! What tips can you share from your family’s recipe? Want to ask a question before you start cooking? I’d love to hear from you in the comments section below!
Lotus Seed Mooncakes Recipe
Makes: 10 Mooncakes | Prep Time: 6 Hours, plus Overnight | Cook Time: 25 Minutes
Ingredients
Wrapper:
1/2 cup Golden Syrup
2 cups flour, sifted
1/2 cup oil
1 teaspoon baking soda
1 teaspoon baking soda mixed with 1 teaspoon water
1 1/2 cups Sweet Lotus Seed Paste (see below)
10 salted preserved egg yolks (optional)
1 mooncake mold, 2 1/2 inch in diameter
1 egg yolk, beaten
Sweet Lotus Seed Paste:
2 1/2 cups (5 ounces) skinned dried lotus seeds
1/2 cup oil
3/4 cup sugar
1 teaspoon maltose syrup or honey
Directions
1. Prepare the Golden Syrup at least 2 hours before you start making mooncakes.
2. Make the Sweet Lotus Paste. Start by soaking the dried lotus seeds in warm water for 1 hour. Next, boil the lotus seeds over medium heat for another hour. When the lotus seeds are done boiling, drain and grind them into a smooth paste in a blender, adding a little water if necessary. Heat 2 1/2 tablespoons of oil in a non-stick pan over high heat. Add 2 tablespoons of sugar and stir until the mixture caramelizes, about 2-3 minutes. Reduce heat to medium, add the lotus seed paste and mix well. Stir in the remaining sugar and mix until dissolved. Gradually add the remaining oil and stir until the mixture is thick and pulls away from the sides of the pan, about 20-30 minutes. Last, stir in the maltose syrup or honey and remove from the heat. Cool the paste overnight. This recipe makes about 1 1/2 cups of Sweet Lotus Seed Paste.
3. The next morning, make the mooncake dough. Combine the flour and baking soda in a mixing bowl. Make a well in the center and stir in the Golden Syrup, oil and baking soda solution, mixing well with a wooden spoon. Flour your hands and knead the mixture into a smooth, spongy dough. Cover and set aside on the counter for 3-4 hours.
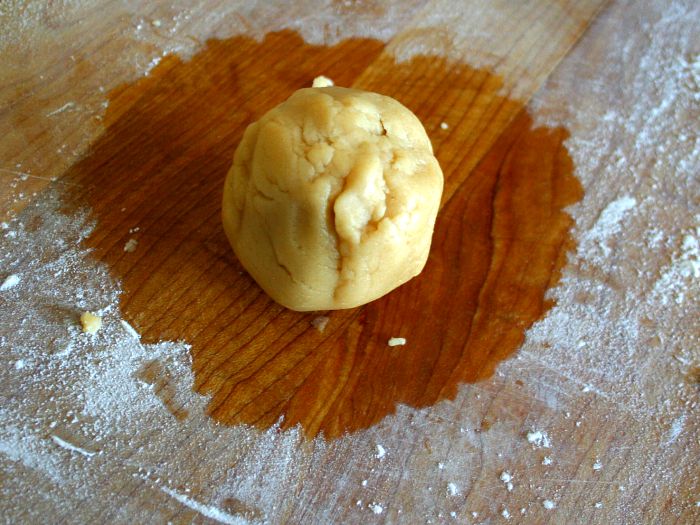
4. Once the dough and Sweet Lotus Seed Paste are ready, divide each into 10 equal pieces and roll each portion into a ball between your palms. If you are using preserved egg yolks, make a depression in each lotus seed paste ball, insert the egg yolk, and then press closed. Repeat with all 10 lotus seed paste balls.
5. On a floured surface, roll a piece of dough into a 5 1/2 inch round circle that’s about 1/8 inch thick. Hold the dough circle in your palm, place a lotus seed paste ball in the center and fold the sides of the dough circle around it to completely enclose the lotus seed paste ball. Press the edges together to seal it.
6. Lightly flour the inside of the mooncake mold. Press the combined dough ball with the lotus seed paste filling into the mold, seam side up. Flatten the dough with your palm or fingers, so the mooncake conforms to the shape of the mold.
7. Turn the mold over and tap it on the side of your work surface to dislodge the cake. Place the mooncake on a lightly greased baking sheet. Repeat steps 5-7 with each piece of dough and lotus seed paste ball.
8. Once all 10 mooncakes are arranged on a baking sheet, place them in a preheated 400 degree oven for 10 minutes. Remove and brush the top of the mooncakes with the beaten egg. Return the mooncakes to the oven to bake for another 8 minutes, or until golden brown.
9. To allow the mooncakes to mellow and taste better, leave them to rest uncovered in a well ventilated space overnight before eating.
Step-By-Step Tutorial
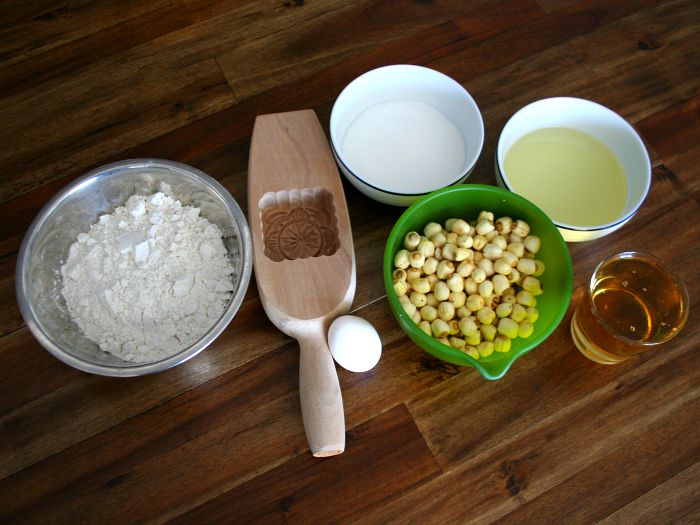
Get started by gathering your ingredients. Aside from dried lotus seeds and the optional salted preserved egg yolks, all the necessary ingredients should be available from a Western grocery store. Basically, the recipe is built from flour, sugar and oil. All the good stuff.
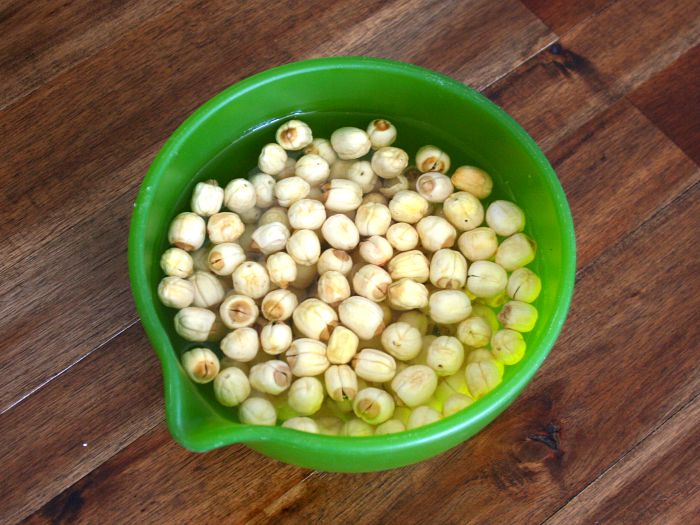
Set aside two hours before you get started for two pieces of prep work. First, soak the dried lotus seeds in warm water for an hour. Meanwhile, make a batch of Golden Syrup — the directions are included in my Picture Pastries recipe.
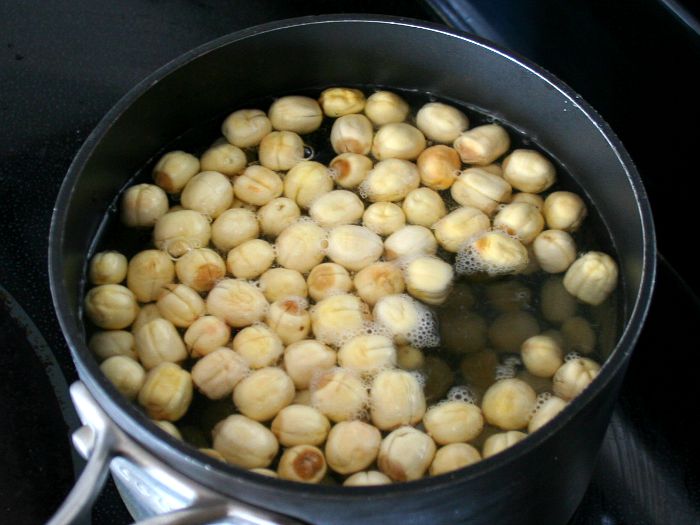
After the dried lotus seeds are done soaking, boil them for an hour over medium heat. With these two prep steps complete, it’s time to get to work.

The first priority is to make the sweet lotus seed paste. Grind the cooked lotus seeds into a smooth paste. Make sure to get all the lumps out! It helps with your blending to add a few drops of water to your mixture.
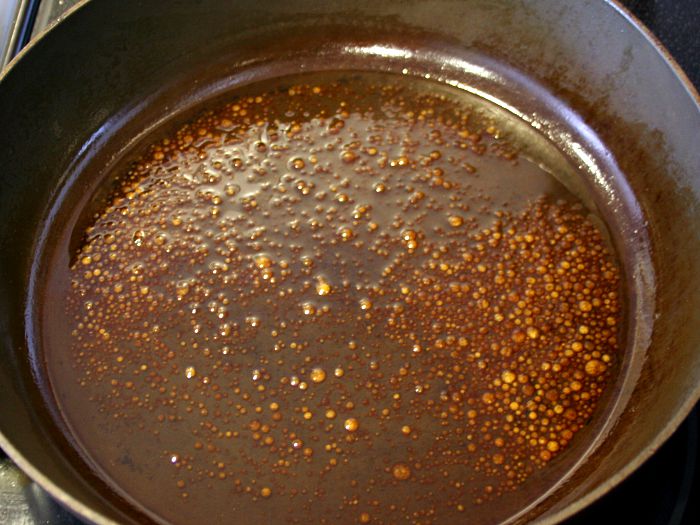
Next, caramelize 2 tablespoons of sugar in 2 1/2 tablespoons of oil over high heat.
Add the lotus seed paste and mix until combined. Add the remaining sugar and watch the paste begin to turn a darker brown as the ingredients are mixed together!
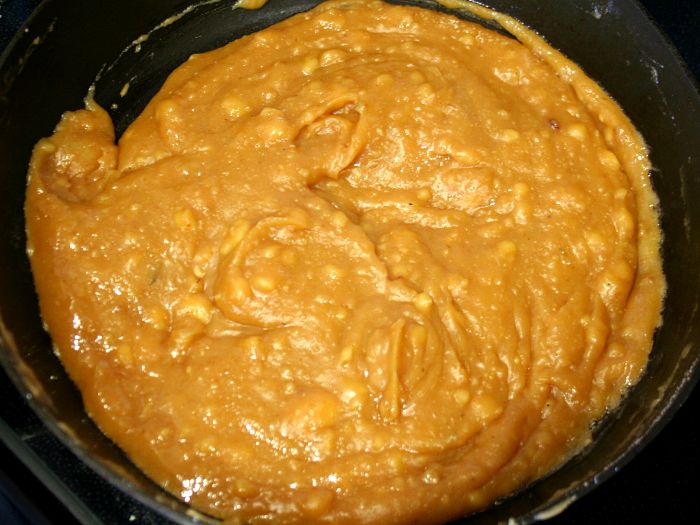
Gradually add the remaining oil to the pan until the mixture glistens. Continue stirring and cooking over medium heat. The mixture will thicken and begin to pull away from the sides of the pan after about 20 minutes.
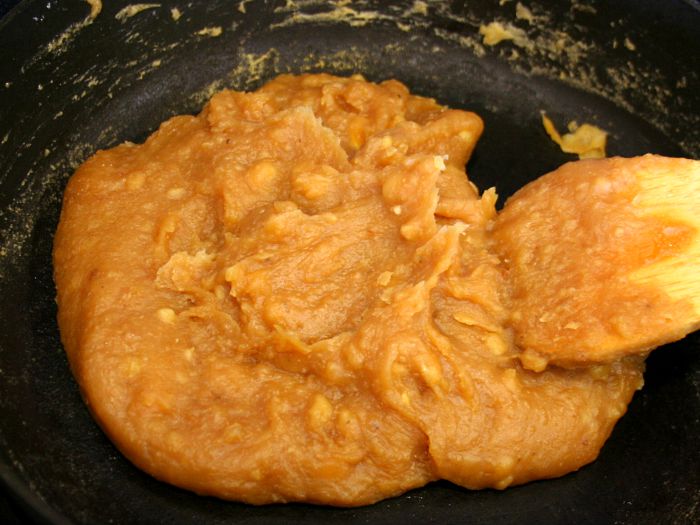
Here’s what the sweet lotus seed paste looks like when it’s done cooking. Note how the paste doesn’t stick to the pan at all.
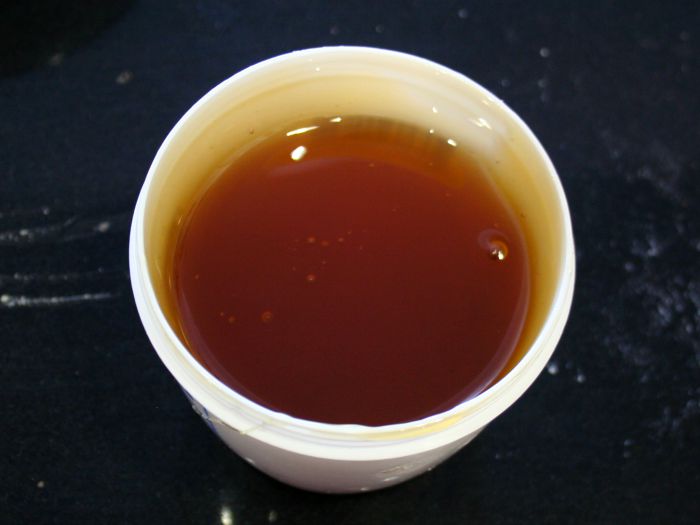
The final step is to add a teaspoon of maltose syrup, which is easily found in any Chinatown grocer. Alternatively, you can substitute honey at this step.
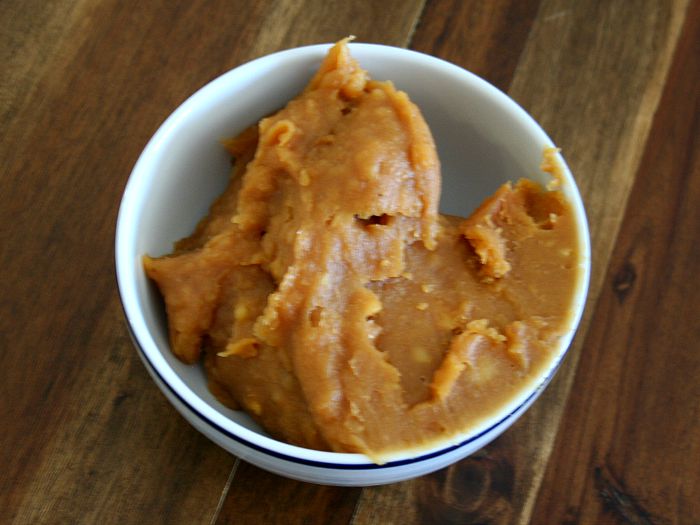
That’s it! The sweet lotus seed paste for the mooncake filling is done. Go ahead and dip you finger in to try it. What does it taste like? You got it, a mooncake!
Remove the sweet lotus seed paste from the pan and place in a bowl. Cover and store overnight in the refrigerator. At this juncture, you’re done for Day 1.
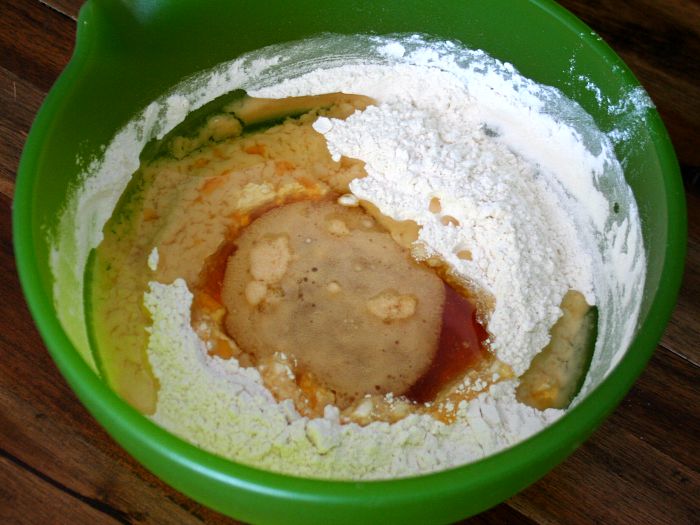
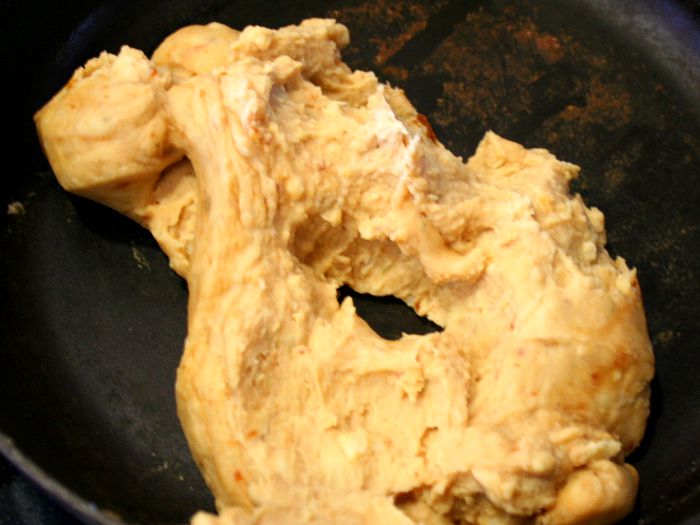
On the morning of Day 2, get up in the morning to make the mooncake dough. Combine the flour, baking soda, oil, Golden Syrup and baking soda solution in a bowl. Mix vigorously with a wooden spoon.

Flour your hands and knead the dough into a soft ball. It should feel very pliable and oily. Cover the bowl with plastic wrap and set aside on the counter for 3 hours.
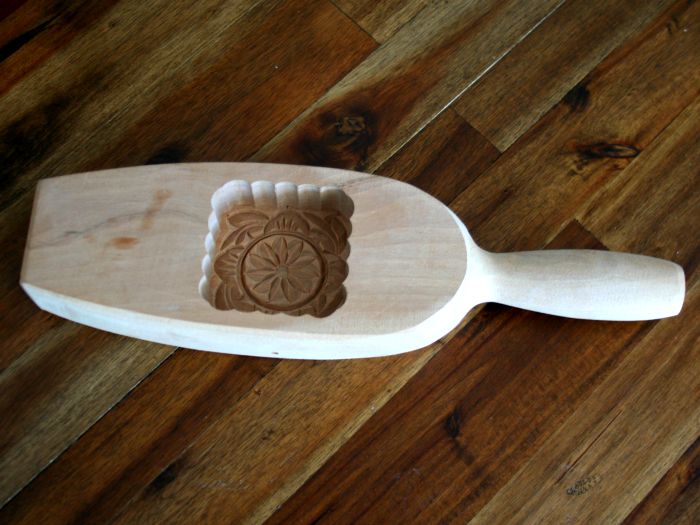
Once the dough is done sitting, it’s time to make mooncakes! Here’s the key tool you’ll need — a mooncake mold. It’s pretty much a solid block of wood with a decorative pattern cut into the center. As I noted above, you can pick one up for about $10-$15 at any Chinatown kitchen supply store.
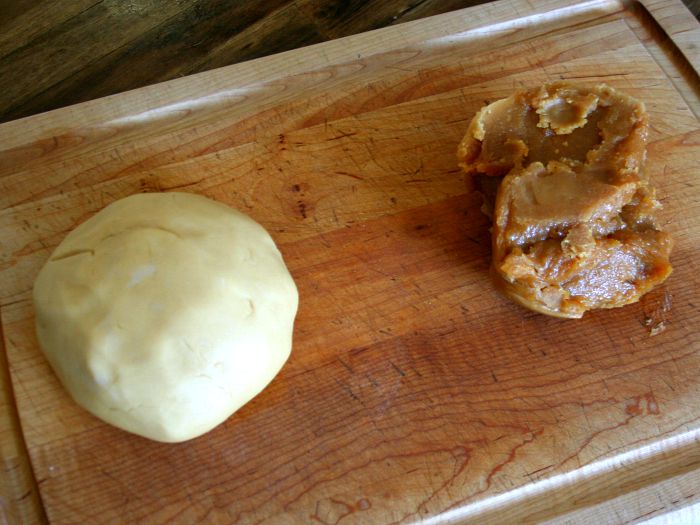
To get started making your mooncakes, turn both your dough and filling out onto a cutting board.

Divide the dough and filling into 10 equally-sized pieces of each. A kitchen scale really helps with this step, as you really do want 10 pieces of filling and 10 pieces of dough that are each exactly 1/10 of the total.
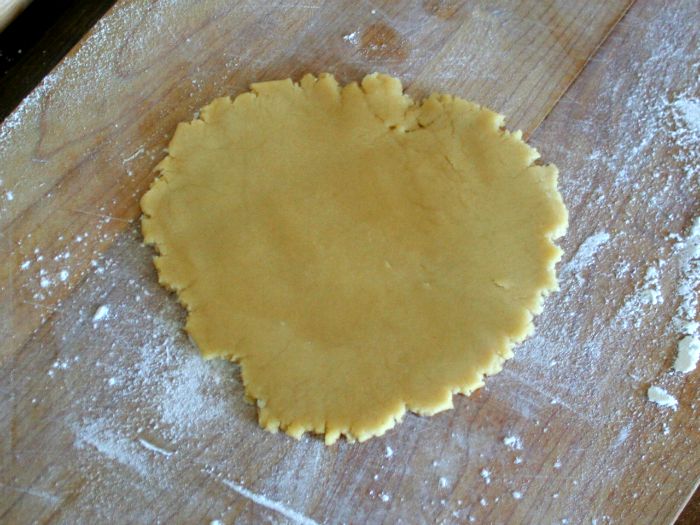
To make a mooncake, roll a dough ball into a circle that’s 1/8 inch thick and 5 1/2 inches wide. The dough should be soft and at room temperature. You shouldn’t notice any cracking or splitting.
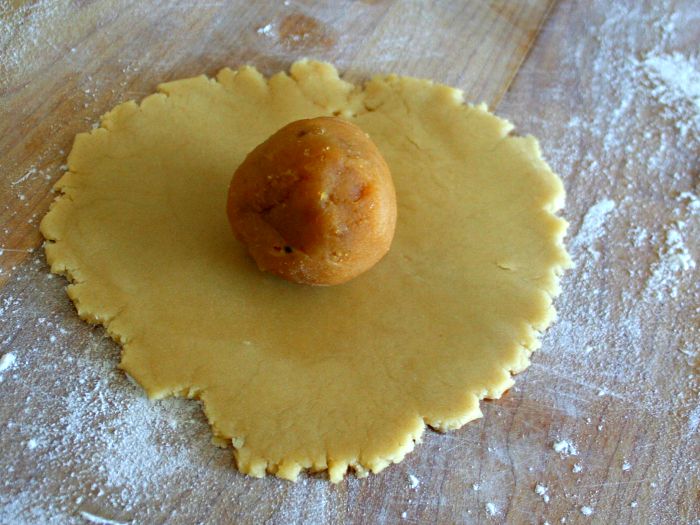
Place a sweet lotus seed paste ball in the center of the dough circle.
Wrap the dough around the lotus seed paste filling, taking care to seal the seam at the top of the package.
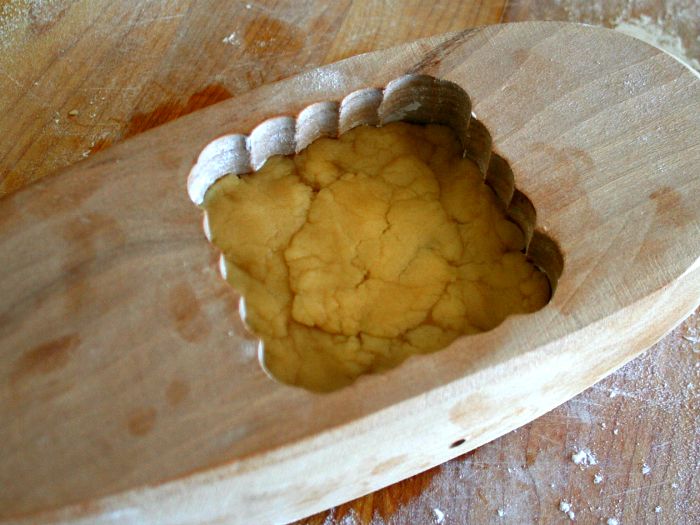
Press the mooncake ball into the mold with the seam side up. Start by pushing down at the center of the ball to spread the package out to the sides of the mold and then use your fingers to make the ball conform to the mold’s edges.
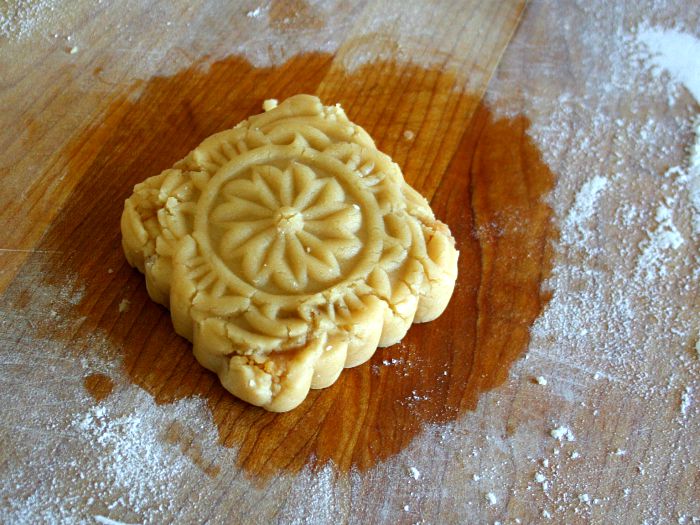
Gently tap the mold on the side of your work table until the completed mooncake drops out. Place the mooncake on a lightly oiled cookie sheet.

Repeat making mooncake balls and using the mold until all 10 mooncakes are complete. Once all 10 mooncakes are arranged on a baking sheet, bake them in a 400 degree oven for 10 minutes. Remove and brush the tops with the beaten egg and then return them to the oven to bake for another 8 minutes, or until golden brown.
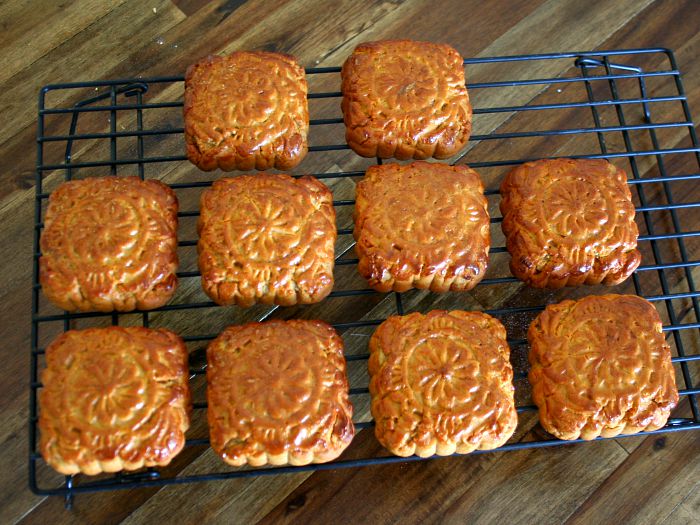
To allow the mooncakes to mellow and taste better, leave them to rest uncovered in a well ventilated space overnight before eating.
Enjoy your mooncakes by cutting them into quarters and then eating them accompanied by a favorite green or oolong tea.
HT: Recipe adapted from Chinese Feasts & Festivals: A Cookbook.


Holly
Hi.
I didn’t see how much oil used to mix the moon cake skin. Thanks!
Wes Radez
Oof, great catch, Holly. It’s 1/2 cup of oil. I’ve updated the recipe accordingly! ~Wes
Holly
Thank you, Wes! What the size did you use for the moon cake(125g, 100g, 75g or 50g)? Thank you!
Wes Radez
Hi Holly, I’m not sure the weight sizing of the moon cake mold, but the one used in this tutorial measures 2.5″ x 2.5″. ~Wes
Holly
Hi Wes,
I made the cakes, and they’re really dry. Do you know why? Thanks!
Lion
Hi Holly. Homemade moon cakes need to sit for about 1-2 days to soften. Initially, the dough will bake very dry and crumbly, but if you allow the cakes to sit for about 2 days the oil from the filling soaks into the dough and softens them. I typically put mine inside a tupperware to do this. They’ll get softer every day.
Wes Radez
Lion’s comment is spot on. Did they soften up after a couple of days?
Lion
Thank you for this recipe, Wes. This is my second year making moon cakes for the Mid-Autumn Festival and boy are they a labor of love, so intensive and time-consuming! I really enjoyed your recipe and instructions. I did find that for the dough I ended up having to add more oil than your recipe calls for, as well as a bit of water, to get the dough to soften and not be crumbly. This may be due to my golden syrup being too thick. When I finished it, it is very thick and slow to pour, even slower than honey. It was very difficult stirring it in. I must have cooked it a bit too long.
But it all turned out well in the end. I made smaller cakes than yours, about 1 and a half inch cakes, which required 1 tbsp each of the dough and filling to make.
Oh, I did lose the first batch to go in the oven. I was a bit skeptical of 400 degrees, and for good reason. They came out burnt before it was even time for the egg wash. Are you sure that’s not a typo? I lowered the temperature to 350 and they all came out much nicer.
Anyway, thanks for sharing. I rarely bake, but these are one that I’m becoming addicted to making each year.
Wes Radez
Thanks so much for sharing your experience, the highs and the lows! A “labor of love” is such an apt description, I think it must be whenever the secret ingredient is time.
I’m glad that you were able to tweak the recipe to achieve a successful outcome. Yes, the Golden Syrup is tricky, the tendency is to cook it too long, which produces the stiff consistency. I remember the first batch I ever made came out almost rock solid, impossible to stir! In that case, just add a bit of water, reheat and stir again to loosen it up.
You did well to lower the heat. The higher heat works with the bigger mooncakes, but I imagine the smaller ones could darken faster.
In any event, well done! We’ll both get better every year with practice!
~Wes
Ta
Hi how long can you store the lotus paste in a container in the fridge. What is the shelf life?
Wes Radez
Hi Ta, generally speaking, I wouldn’t try to store the lotus seed paste for more than a week in the refrigerator. It will go bad eventually, of course, but it will also dry out and become harder to work with as time goes on. Better to use the lotus seed paste immediately! ~Wes
Annie v. Dacanay
Where can I buy golden syrup?
Wes Radez
Hi Annie, Unfortunately I’m not aware of any place to buy Golden Syrup. The recipe is in my Kung Chai Peng recipe and it’s really easy — you can just leave it simmering on the stove on an afternoon you’re working around the house. ~Wes
Mary
Hi Wes,
I am so glad I found your recipes! Do you know the calories that are in your mooncake recipe? The store-bought moon cakes are dense, greasy, and very high in calories. Again, thank you and I will definitely be using your recipes. (I hope I can find the mooncake mold)
Thanks,
Mary
Wes Radez
Hi Mary, I’m sorry that I don’t have a specific calorie count, but I have to believe the handmade variety is healthier than store-bought. There’s a certain lightness to the filling you get when you make it yourself — you’ll love it! Thanks for being here. ~Wes
ron chow
I learned from YouTube many versions baked and unbaked. I now make “American style” but with mooncake moulds. Dessert style and candy type.
Wes Radez
That’s really interesting, Ron. How do your versions differ from the traditional style? ~Wes
Bill Griffiths
Far too complicated….I will buy mine ready made……as for the taste..WELL, you can’t beat an experienced cook
I was married in Hong Kong 1952….I was ex British Army .lived in Hong Kong for several years 1949 to 1952….1955 to 1958….I was married there in 1952 and go back there each year for two months each visit…..will be there in just a few weeks time…( now aged 88)
Wes Radez
Good to hear from you, Bill! Glad to hear that you’re planning to be in HK soon. ~Wes
Jude
Wes, I’m white Canadian but have always loved mooncakes. I have everything ready to make them this week except for the moon cake mould which I can pick up this week.
I have a question about pressing the balls into the mould though. I’d imagine after using the mould a number of times, it would absorb some oil and not stick. But the first few times you form the moon cakes, don’t they stick? Do you find with a sharp tap, they always release easy and come out?
That’s my main concern so any answer will help me. Thank you!
Wes Radez
That’s great, Jude. Excited to hear you’re giving it a shot, let me know how it goes! To answer your question, yes, the sharp tap should work from the get-go. Be persistent and it’ll drop right out. There’s enough oil in the mooncake wrapper that sticking won’t be a problem. ~Wes
Ling
Hi, I’m in the UK and want to try this recipe however I don’t quite get the cup measurements that you use in the US. Are you able to include weight measurements as I don’t want to get it wrong? Thanks!
Wes Radez
Hi Ling, I wish I could help, but I’m not sure of the weight conversions! ~Wes
Lauri
Hi, Wes. Thank you for this recipe! I made them with my 10-year-old daughter, who is adopted from China, and we had a great time. They taste so much better than the ones we’ve purchased in the past.
A couple of notes about the lotus seeds…. I bought a 5 oz. bag from the Asian market, but I measured only about 1 1/4 cups of seeds. I wasn’t sure if I’d have enough, since you said 2 1/2 cups, but it worked okay. Also, I found on another site that you should break the soaked seeds open and remove the bitter green sprouts. I only found about 10 seeds that had sprouts, but that might be a good addition to your recipe. I know, another thing to do!
Wes Radez
I’m so glad to hear that, Lauri, and thanks for the tip! It sounds like you and your daughter really enjoyed the time together. ~Wes
Ian
Hello, I’m making jian dui (fried sesame balls) and used this recipe for lotus seed paste. For me it took two, not one, 5-oz bags of lotus seeds to make 2.5 cups. I wasn’t sure whether to go by weight or by volume, but ended up using the full 2.5 cups (10 oz). My paste never pulled away from the pan, and wasn’t as golden-brown as these photos show. It also had a noticeable legumey flavor and wasn’t very sweet, so I concluded that I should have gone with the 5 oz. To fix the ratio I just incorporated another batch of sugar and oil, using the same process as the first time. That worked fine and now it looks, tastes behaves like it should. Thanks!
Oh- my blender wouldn’t blend the boiled seeds (I’d have had to add a huge amount of water), so I smashed them with a mortar and pestle and pressed the paste through a wire mesh strainer. Took a few extra minutes but worked and gave a great result.
Wes Radez
Wonderful, thanks for sharing your experience, Ian. Glad you ended up with a good result. ~Wes
Miriam
Hi just wondering if you use all purpose flour or cake flour? Thank you!!
Wes Radez
All purpose! ~Wes